Assets
Learn about the various assets available to enhance your form creation journey
Mailing Lists
The 'Mailing Lists' asset allows the respondent to deploy their form to a preset contacts list defined by the form creator. A mailing list can be used to invite other respondents with a personalised message to complete your form. When deploying your form using a mailing list, it allows you to track if the mail has not been delivered (bounced), or if the respondent has chosen to opt out of receiving any emails.
To create a new mailing list, type in your list name into the input box above the mailing list table and click the 'Create new mailing list' button.
All of your mailing lists within your account are listed in the table below with columns displaying different statistics:

ID: Displays the unique mailing list ID. By clicking on the ID number, it allows you to edit the settings of the specific mailing list.
Mailing List Name: Displays the unique mailing list name. By clicking on the name, it allows you to edit the settings of the specific mailing list.
Created: Displays the date and time that the mailing list was created.
Last Updated: displays the date and time that the mailing list was last edited or updated.
Entries: Displays the number of recipients that are on the mailing list.
Action: This drop-down menu box allows you to Edit, Zero or Delete the mailing list.
- Edit: Allows you to edit the settings of the specific mailing list.
- Zero: Allows you to reset and clear the entries on the mailing list.
- Delete: This will delete the mailing list entirely and this action cannot be undone.
Edit the Mailing List Settings
![]()
You can edit the options of your mailing list by clicking on the list 'ID' or the 'Mailing List Name' columns. Alternatively, select the 'Edit' option from the drop-down menu box in the far right column.
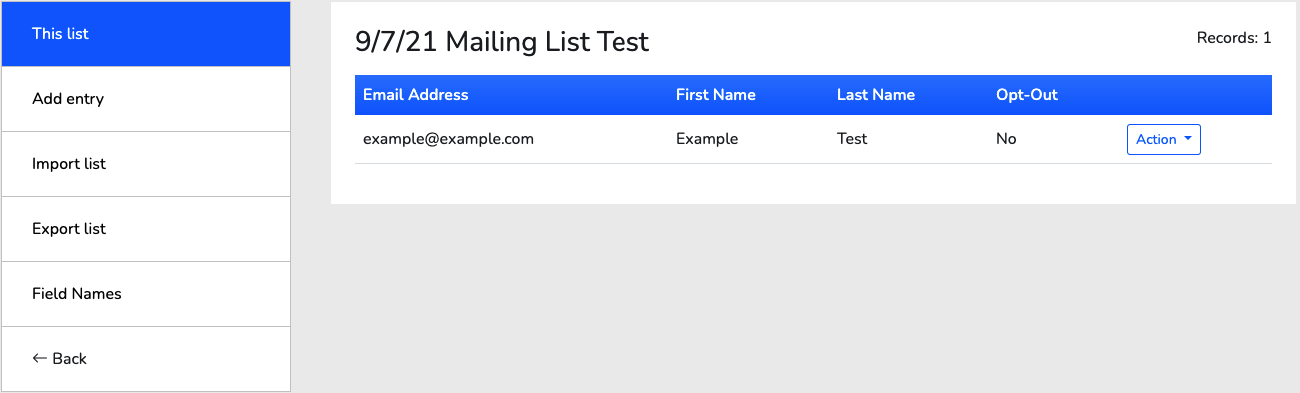
View ListView List
The 'View List' option will display all mailing list entries in your list. In this page you will find a table with all entry email adresses and additional entry information in each field column. The mailing list asset allows for eight additional fields and will display if the recipient has 'Opted-Out' or if the email has bounced (usually due to an invalid email domain). At the end of the table, you will find a drop-down menu box with an 'Edit' and 'Delete' option for the specific mailing list entry.
Add EntryAdd Entry
The 'Add Entry' option is where you would create a new mailing list recipient. Simply enter their email adress into the top row and additionally input the field information for each row.
Import ListImport List
The 'Import List' option enables you to upload a file containing the email addresses and any other field information you wish to use within your mailing list. This file can be uploaded via:
- An excel spreadsheet (.xls/.xlsx) file, with the email address in column 1, and the user defined data in columns 2-7 of the first sheet in your spreadsheet.
- A comma separated value (.csv) file, with each field separated by a comma and a new line separating records.
- A text file (.txt) can be used If you want to add a list of email addresses quickly, then create a text file with each email address on a new line and upload it.
You can choose whether you would like to import the file to replace the current mailing list entries or to append the list.
Export ListExport List
The 'Export List' option allows you to download the specific Mailing List entry details, and the encrypted URL for each specific respondent.
Download Mailing List Only: This will download the specific mailing list with all of the entries data in a Spreadsheet.
Download Mailing List with URLs: Select a form from the drop-down menu list and export your mailing list entries data to a Spreadsheet. An encrypted URL will be input into the spreadsheet containing any hidden data that you have as parameters listed from the mailing list.
List SettingsList Settings
The 'List Settings' option allows you to edit the mailing list title and pre-define a field name for up to eight user defined fields (Field 1 - Field 8). It is not necessary to name the user defined fields but it will be easier to maintain your emails and reports if they are set up.
The user defined fields can be incorporated throughout a form, making it personal to the respondent.
Subscribe FormSubscribe Form
![]()
The 'Subscribe Form' feature is the easiest method to allow respondents to signup to your mailing list. This feature will embed a 'Subscribe to our mailing list' option to any web page. Simply copy and paste the code provided into your web page and style it to match your site.
Once a respondent has subscribed to the mailing list via the website feature, an email will be sent to confirm their request before adding it to the list. User defined fields can also collect additional details automatically if they preset to the mailing list.
Bounce ReportBounce Report
The 'Bounce Report' will display any information regarding 'bounced' (rejected) emails. The columns in the report table are defined as:
- Email: The respondents email address.
- Opt-Out: If the respondent has chosen to stop receiving emails via the mailing list, it will be displayed here.
- Bounced: If the mail sent out has 'bounced', it means there was a sending error and it could not be processed.
- Bounce Type: The reason as to why the sent mail was rejected and the error status.
- Action: There are a number of different reasons as to why email would appear as bounced, but they can be grouped into hard bounces and soft bounces:
- Hard bounces: Where the email cannot be delivered ever to the address and can result from the mailbox being closed, or usually a typo in the mail address.
- Soft bounces: Usually be resolved by re-sending later that day. Additional reasons for soft bounces can be a full mailbox, an out-of-office auto-responder, or a temporary network problem.
List: Displays the mailing list title.
Records: Displays the number of recipients within the mailing list.
Asset Library
The 'Asset Library' is a location where all of your uploaded assets are stored. If you need to include a file to use in one of your form questions, it needs to be uploaded to the library prior to the creation of the question.
The 'Folders' window to the left of the library categorises each file that is uploaded into one of four directories. Optionally, a sub-folder can be created by right clicking on one of the four main folders and pressing 'New SubFolder'.
- Files: Linked to your form in a question or can be sent out with an invitation email.
- Images: Included in your form through the freeform text box in a question.
- Logos: Used in the 'Header' section within 'Design' for your logos or banners.
- Backgrounds: Images used as a background to one of your forms.
Managing your Assets
You can manage your assets using the toolbar at the top of the 'Asset Library'. Select the folder you would like to manage and use the following tools:
- Upload: Opens up your file explorer for you to locate and upload to the library.
- Refresh: Used to refresh your asset library upon uploading a new file.
- Settings: To filter or sort the view of all files.
- Maximize / Minimize: Used to enlarge or reduce the 'Asset Library' window within your web browser.
- Help: An additional help guide to the 'Asset Library' powered by 'CK Finder'.
By right clicking on any of the images or files you have downloaded, a pop-up menu will appear providing the options to 'view', 'download', 'resize', 'rename' or 'delete' the selected image.