Top Starting Tips
Learn the top ten quick start tips that you should consider before launching your first form
Tip #0 - Don't ignore tip 10!
Tip #10 is the most important tip on this list. The final version of your form should be checked for errors or mistakes more than once by multiple people.
Tip #1 – How to publish your first form by changing your form to ‘Open’ status
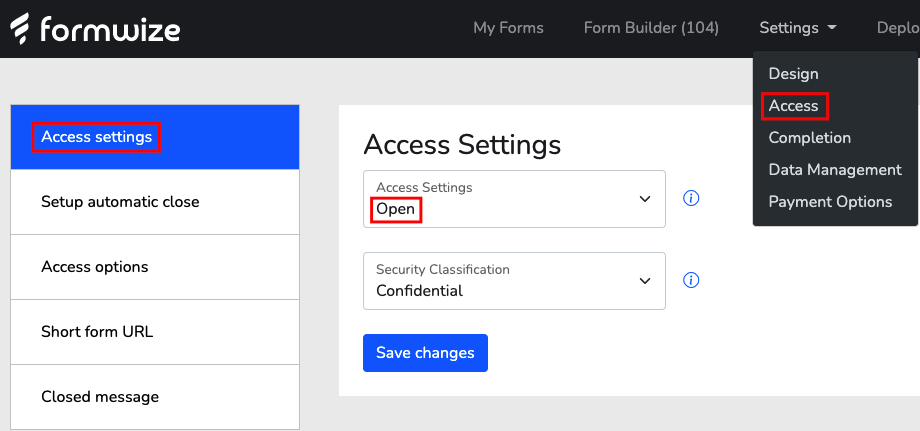
Once you create a new form it will automatically be set to ‘Under Construction’, where only you, as the form builder, are able to view it. To allow customers (form respondents) to see and access your new form, edit your form via 'Settings' \ 'Access' \ 'Access Settings' and change it to ‘Open’.
Tip #2 – Adding an Introduction page to explain to your respondents what your form is all about
There isn’t a pre-set introduction question type available, but to create some pre-amble text to add to your form, you can add a ‘Hidden’ question type from the ‘Special Functions’ category.
Once saved to your form (drag and drop or use the question positioning buttons to add this question to the top of your form), change the view to ‘List View’, where you will then need to add in a page break between the ‘Hidden’ question and your next question type.

Tip #3 – Adding an Image in an Title or adding a Sub-title
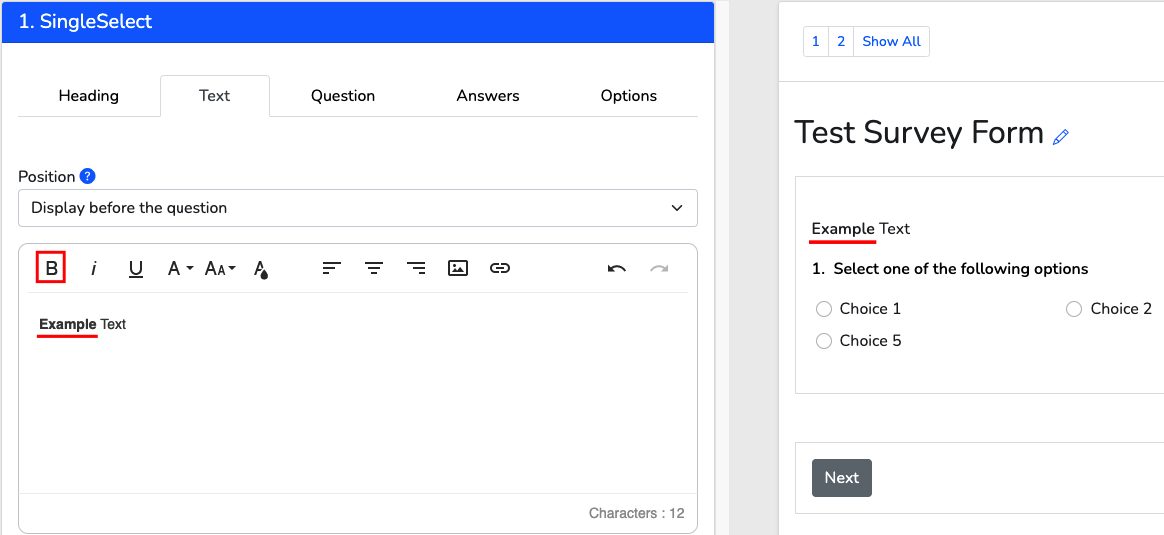
Within the 'Text' section of a question type, you are able to edit your input text by utilising the various features. For example, to make your text in bold, simply highlight your text and select the 'B' button.
You can add an image as a title by pressing on the ‘Image’ icon within the ‘Text’ box and upload any visual Title images that you have created.
Tip #4 – Removing the Question Numbers to make the user interface less cluttered
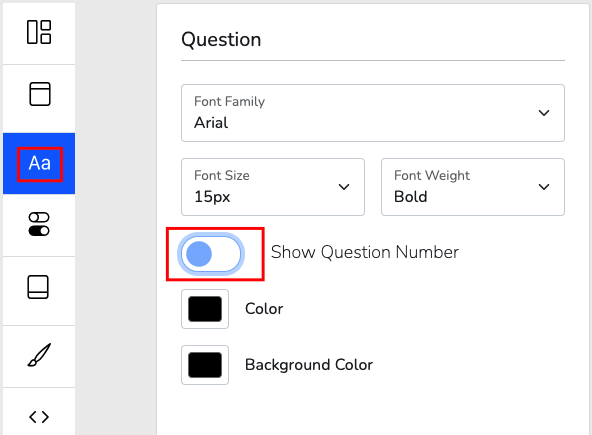
Question numbers are automatically turned on for every form you make. To turn them off on a form, go to 'Settings' \ 'Design' \ 'Typograhpy' and disable the ‘Show Question No.’ option at the top. They are useful during the build phase to allow you to refer to specific questions when testing with respondents, but most modern forms don’t show them once the form is ready to be shipped as they tend to clutter the interface.
Tip #5 – Adding a Save and Resume option
We suggest that you always add in the ‘Save and Resume’ option to allow the respondent to complete your form in various stages. To input this, go to 'Settings' \ 'Completion' \ 'Save and Resume' and select the option which applies to your form.

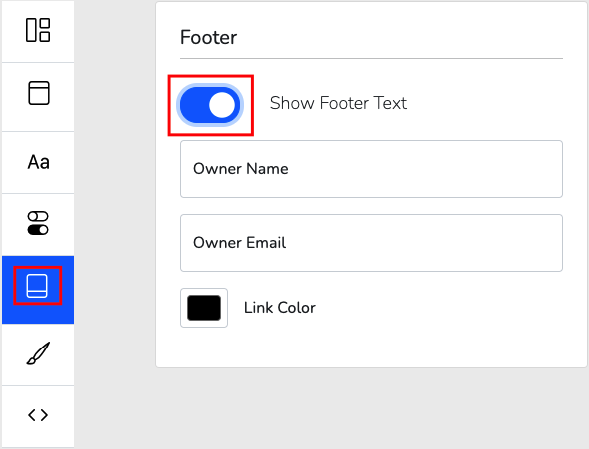
Tip #6 – Adding a Footer
A footer is an important part of any form type as it gives the respondent a contact address if they have any questions. To create a footer, go to 'Settings' \ 'Design' \ 'Footer' and input any necessary contact information.
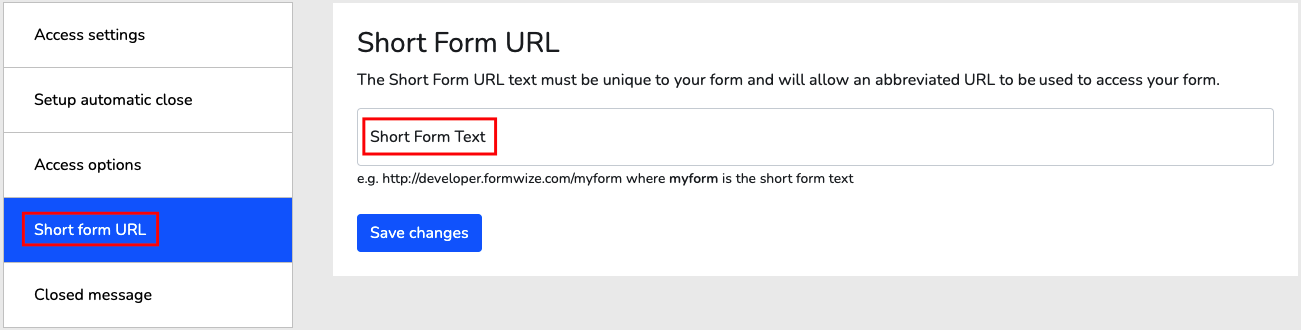
Tip #7 – Creating your Short Form URL
It is important to create a Short Form URL link so that your form can easily be remembered and quoted. To create your own Short URL, go to 'Settings' \ 'Access' \ 'Short Form URL' and enter your desired text for your form.
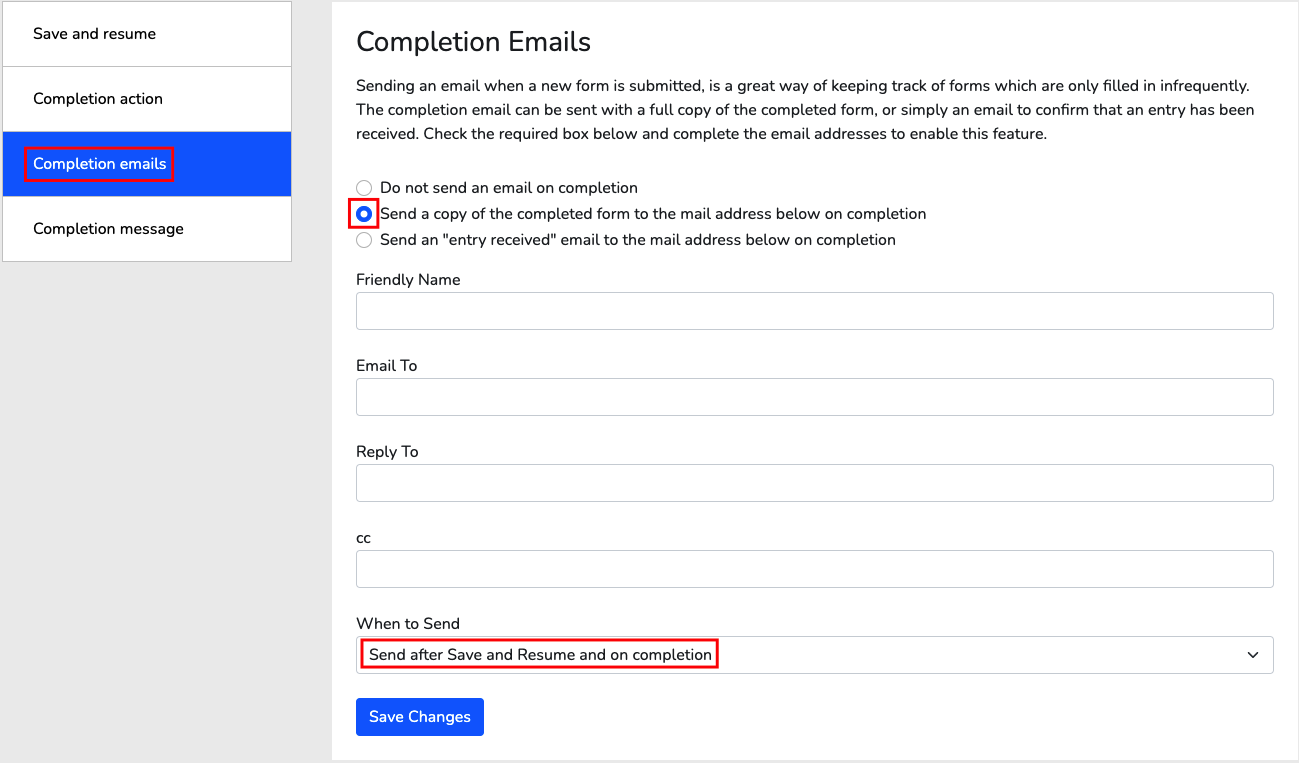
Tip #8 – Receiving e-mail notifications upon completion
You can enable an option to receive notifications when a form has been submitted. This allows you to receive an email containing all of the respondents submitted data or just a simple completion message. This is instead of logging into your account periodically to check the form results page online.
Go to 'Settings' \ 'Completion' \ 'Completion Emails' and select the following box which applies to your form.
Tip #9 – Downloading your forms and data (or both together)
Downloading your form, with or without collected data, allows you to view forms and data results offline, in either a PDF, Excel or CSV file (Comma Separated Values) format.
There are two ways that you can do this:
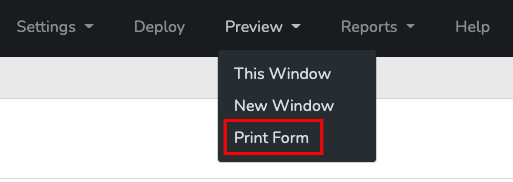
Save Without Data (PDF)
To keep a blank copy offline of your form (minus any data), go to 'Preview' \ 'Print Form' and choose your PDF print driver to save locally.
Save With Data (PDF)
To keep a completed copy offline of your form (with data), go to the 'My Forms' section, click the ‘View Reports’ icon within the ‘Reports’ column,
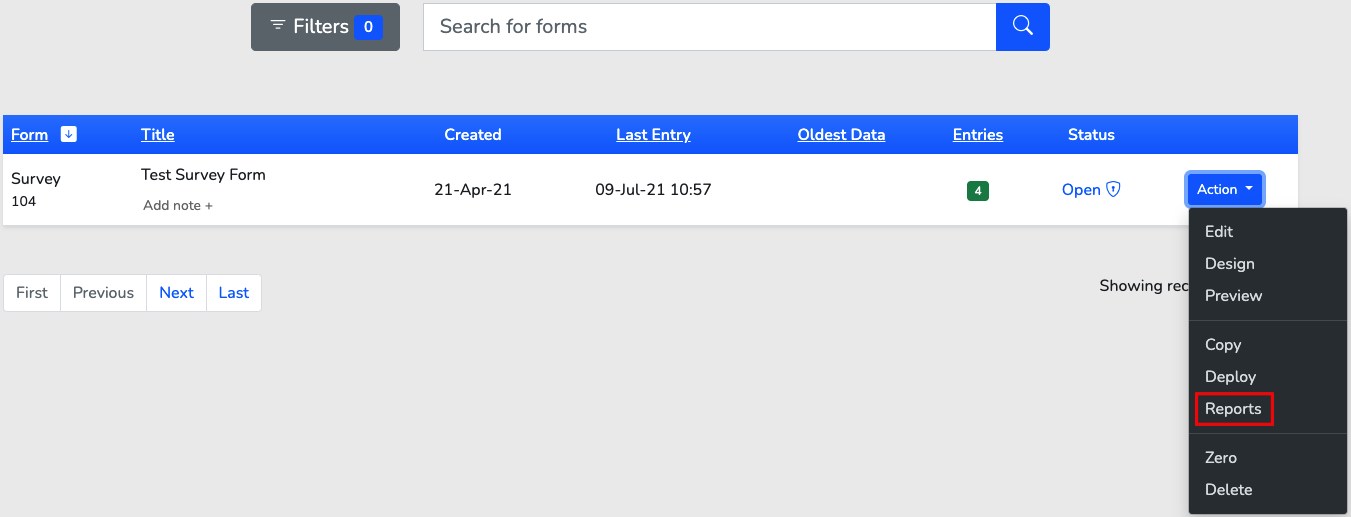
then go to 'Reports' \ 'Browse Entries' and select which form entry you would like to export.
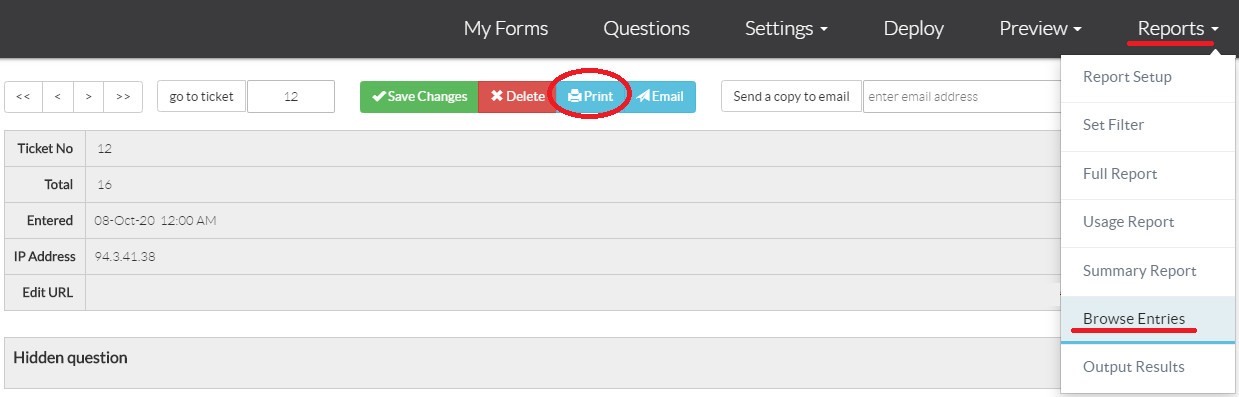
After this go to 'Print' \ then click the ‘Print’ icon \ 'Destination' \ 'Save as PDF'.
Save With Data (.xls)
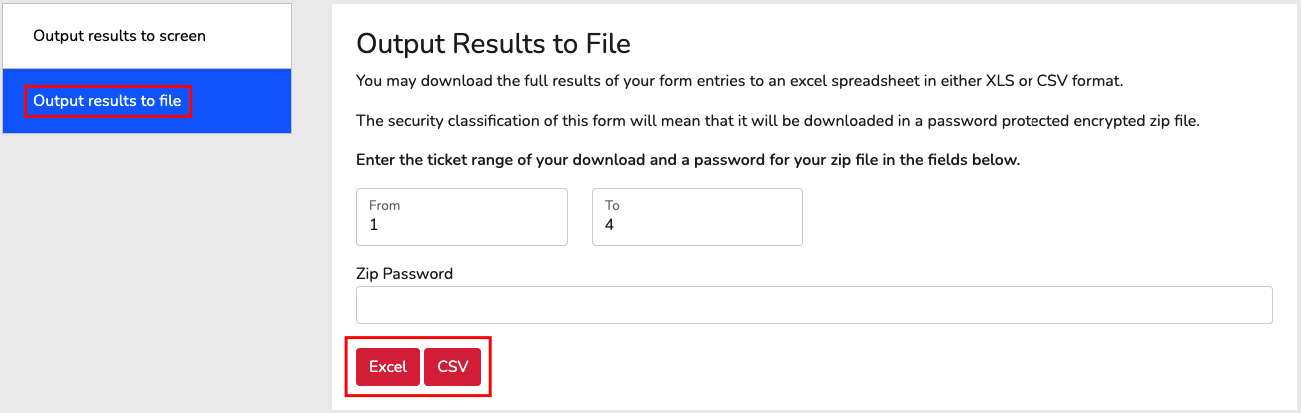
To download form results (collected respondent data) as an Excel or CSV file, open your form and go to 'Reports' \ 'Output Results' \ and select from the two options.
Save Without Data (.xls)
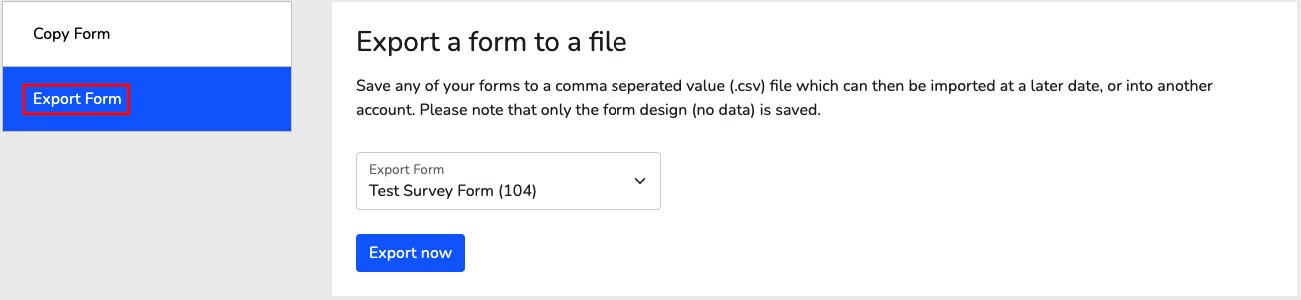
Another option to keep a blank copy offline of your form and get your form structure (without any data), is to download the form to an Excel file formatted CSV file. This brings down the question headers and is mostly used for exporting forms into other user accounts but does give you a base copy of your form question field structure.
You can do this via 'My Forms' \ 'Export\Transfer a Form' \ 'Export Form'
There is actually a third way to retrieve your data via API, but we will save that for another day. See the 'API Helpsheet' topic for more information.).
Tip #10 – Get a friend to check over your work for errors
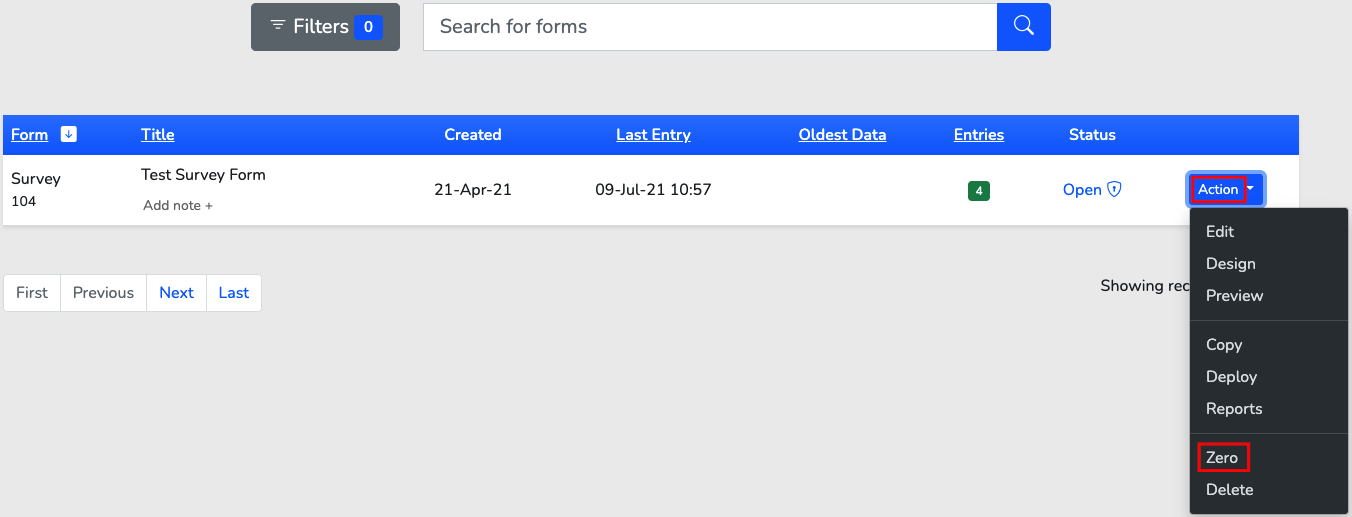
Upon completion of your form, it is important to test your final form for bugs or mistakes. Your co-worker or friend will be able to test your form and identify any mistakes throughout, which you might have not been able to see yourself. After the form has been checked over by your peers, you can zero the form results before sending it out to the respondents deleting all of the test submissions by going to 'My Forms' \ 'Action' \ 'Zero'.